Friday, October 30, 2009

Adding Distance Thru TGM


After my club championship, one of the things I discussed that I needed to improve was distance. In the summertime, my drives probably averaged around 280 yards and I hit my 8-iron about 155 yards long. However, one of my main goals for next year is to add about 25 yards with my driver and an extra club with my irons.

While it's vital for me to at least maintain my accuracy while adding distance, I think the extra distance could make for a much improved scoring average as I would likely increase my GIR percentage along with my chances of going for par-5's in two, both of which correlate to lower stroke averages. Furthermore, it will increase my chances to get a wedge in my hand and with full swings I'm usually pretty precise with anything from a 9-iron or less.

But how does one accomplish that without losing accuracy?

While I will discuss this more with my instructor Ted Fort, here's some of the ideas I had for a plan to achieve my power goals.

STEP 1 - WEIGHT LOSS

After the operation I wound up gaining 30 pounds due to having to take 6 months from working out and well, general laziness. However, I plan on losing that 30 pounds which usually has never been much of a problem for me since I have a fast metabolism.

I think this can help improve one's pivot which I strong feel adds to power and more precise ballstriking. However, the bigger reason for the weight loss in regards to golf is that the upcoming tournaments will be ones where the golfers have to walk the course and I'll have to increase my stamina for that so I can finish the final holes of a tournament stronger.


STEP 2 - INCREASE FLEXIBILITY

I will be working with Roger Fredericks' golf stretching exercise program. I worked with it before and liked it a lot. Very simple and effective, but quit doing the program. Yoga classes are a good idea as well, but they start to get a bit expensive and time consuming. While I believe that stretching can help the pivot which can help with power and more precise ballstriking, I also think it's a good idea for overall health and golf longevity as no other sport, IMO, requires the total flexibility like golf.

Here's a video of Fredericks demonstrating some of his stretching program:


STEP 3 - KNOWING WHERE YOU ARE SO YOU CAN GET TO WHERE YOU WANT TO BE

One of the clever quotes from Jim McLean's 'The Eight Step Golf Swing' talks about the golfer and the teacher being able to communicate with each other and McLean compares it to giving somebody automobile driving directions. In essence, McLean stated that in order to give directions you need to know where the person is coming from so you can tell them what streets to take.

The same applies with golf and I believe the same applies here. I estimate that in order to reach my power goals, I will need to increase my clubhead speed on average by at least 8 mph. But first, I need to know what the clubhead speed is with each club and I plan on using the doppler radar technology behind the Swing Speed Radar


The Swing Speed Radar can be purchased for $99.

STEP 4 - USING THE ENDLESS BELT EFFECT (2-K) TO MY ADVANTAGE

I discussed Homer Kelley's 'Endless Belt Effect' in this TGM Translation Post.

I'm not exactly sure Physicist Dr. Robert Grober of Sonic Golf would agree completely with the Endless Belt Effect, but I think he would believe that the idea wasn't too far off in comparison to his research.

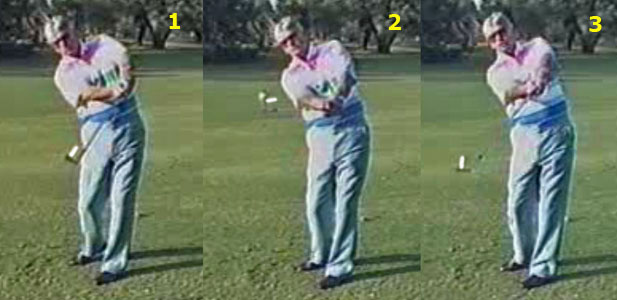
The Endless Belt Effect states a couple of things. One is that the hands on the downswing move at the same speed thru the downswing, but the clubhead will accelerate in the downswing.

So, if I were going to give an arbitrary number of say the hands moving from the top of the swing to about one foot downward of say 50 mph, then according to the Endless Belt Effect, the hands *should* move at 50 mph from that one foot downward to impact. However, the clubhead may reach impact at say 100 mph, but in the startdown it may move at say 50 mph, then accelerate to 75 mph when the clubshaft is parallel to the ground, then accelerate to 100 mph at impact. Again, those numbers are arbitrary, just trying to make the Endless Belt Effect easier to understand.

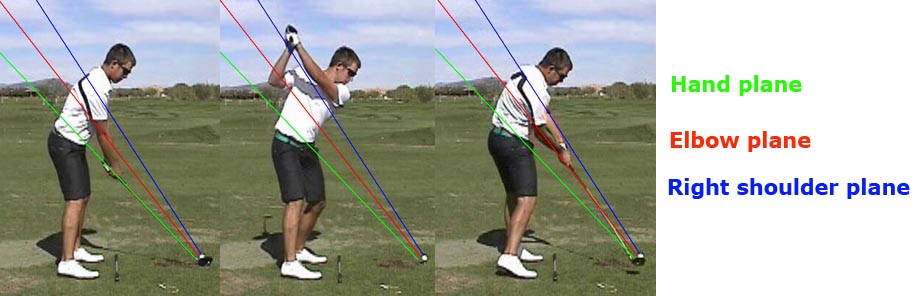
The other part is the 'size of the pulley' and it in regards to clubhead speed. The pulley size has a lot to do with the delivery path of the hands and the 'snap' of the release and how somebody 'maximizes trigger delay.'

Jeff Mann did a very nice job of describing Endless Belt Effect over at his Perfect Golf Swing Review Web site.

The best way I can describe it is the more the golfer delays the trigger of the downswing (aka maximum trigger delay) the 'smaller their pulley' will be. The smaller their pulley, the more clubhead speed they can achieve despite having a SLOWER hand speed.

So let's say you have two golfers whose clubhead speed is say about 110 mph with a driver. But golfer A really maximizes that 'trigger delay' and has that very small pulley while golfer B doesn't maximize that trigger delay and has a large pulley.

Even though they both have the same amount of clubhead speed, Golfer A can achieve it with SLOWER handspeed than Golfer B.

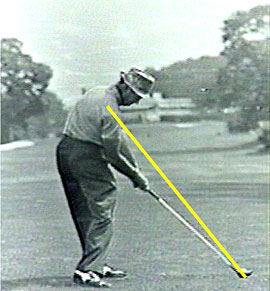
So, if Ben Hogan (maximum trigger delay, snap release, small pulley) and Tom Watson (no maximum trigger delay, full sweep release, large pulley) were to swing the clubhead at 110 mph, then Mr. Hogan could do it with say a hand speed of 50 mph while Mr. Watson would have to do with a faster hand speed, say 75 mph.

That doesn't mean you HAVE to maximize your trigger delay and make your pulley smaller to hit it farther, it means that you EITHER have to maximize your trigger delay or increase your hand speed. I plan on doing a little of both for the full effect. But if I kept my same hand speed and maximized my trigger delay, that would increase distance as well.

STEP 5 - TRACKMAN WORK

I think Trackman is a wonderful tool for helping with the golf swing, but I think it's best work is done with the driver because it can help add a ton of distance along with increasing accuracy. The big part Trackman has gotten into is shallowing out the angle of attack with the driver, even to the point of promoting an upward hit with the driver to increase distance. A golfer can greatly increase yardage by taking the same swing and just changing their angle of attack. And according to Trackman, downward hits with the driver cause the 'Smash Factor' (ball speed / clubhead speed) to decrease.

In their July 2009 Newsletter Trackman studied the case of Kevin Streelman who used Trackman to greatly increase his power off the tee.

In roughly 12 months from using Trackman, Streelman changed his Angle of Attack with his driver from a -5.6* angle of attack to a -1.0* angle of attack. Despite still hitting down on the ball, that decrease in the angle of attack caused him to increase his carry by 23 yards (an 8.6% increase in carry alone).

Furthermore, his clubhead speed went down by 2 mph in this time, but his ballspeed went UP by 4 mph. That changed his smash factor from 1.43 to 1.49. Furthermore, his spin rate went from 2,887 rpm's to 2,399. So Streelman greatly increased his carry and increased his roll on top of it. Probably increasing his power in his driver by 25-35 yards on average.

He also wound up switching from a Cleveland Hi-Bore XLS Driver with 10.5* loft to the same clubhead with 8.5* loft and with a stiffer shaft (and still increased his carry by 23 yards and lowered his spin rate).

Amazing.


STEP 6 - EQUIPMENT CHANGES

Hopefully when I feel the changes to my swing are complete, I'll make some changes and tweaks to my equipment.

I will probably go to some KBS shafts in my irons and possibly my 3-hybrid. I will then probably change my driver and 3-wood. I'm interested in changing my lofts with these clubs as right now I carry a 10.5* driver with a 15* 3-wood. With my most recent swing changes, I can actually hit the driver very well off the deck. That sort of notes that I need a lower lofted driver already. I'm very interested in the Adams Golf line of drivers. Also, I believe with my ability to hit my current driver off the deck, I will probably need to go to a 13* 3-wood.


3JACK

Thursday, October 29, 2009

3Jack's Translation of TGM: Part 9J


10-14 (Hip Turn)

The Corresponding Chapter 7 Translations for both 10-14 and 10-15 can be found HERE.

STANDARD HIP TURN - Hips turn freely in each direction AND the weight shifts in both direction. If you use a Circular Delivery Path, use your turning right hip on the downswing to carry the Right Elbow into the Release Position to create a procedure where the Trigger Delay controls the swing.

SLIDE HIP TURN - Hips slide in both direction. Often called a 'delayed hip turn' because the hips slide first, then turn. S&T and 'hitters' like to use a slide hip turn which tilts the axis on the downswing and gets the right shoulder on plane.

SHIFTLESS HIP TURN - Hips turn in both directions, but do not have a weight shift in either direction. Usually used on 'soft' swings where the emphasis is accuracy over power. Problem is that it can cause the dreaded 'spin out' move and the axis won't tilt and make it very hard for the right shoulder to get on plane and causes the Over the Top move. If you want to use the shiftless hip turn, the golfer should have 'pitch elbow' in order to do so.

REVERSE HIP TURN - Golfer wants to shift the hips into the position they would be at impact as they make their backswing. Homer says this is very good for short shots.

ZERO HIP TURN - No Hip Turn, No Hip Slide, No Weight Shift.


10-15 (Hip Action)

This deals with the hip turn in relation to the shoulder turn.

STANDARD HIP ACTION - Hips initiate and lead the shoulder turn throughout the swing.

DELAYED HIP ACTION - Shoulder lead the hips and power the backstroke Hip Turn. More of a 'Hands Controlled Pivot' motion. Very good for golfers who want to prevent over-swinging.

SHORT HIP ACTION - The hips power the shoulder turn on the backswing, but the shoulders take over on the downswing.


3JACK

Wednesday, October 28, 2009

Swing Heeler Training Aid

As you know, I'm a big proponent of good footwork in the golf swing and feel it's the most overlooked and underrated part of a good golf swing. I saw a video for the Swing Heeler training aid and I think it gives a great concept of how to get the golfer to master efficient footwork.

I've been trying to read up more and more on 'ground forces' in the golf swing. I was watching a Sports Science who on Fox Sports Channel and they had a race between NFL Wide Receiver Dennis Northcutt and an ostrich. The Ostrich blew away Northcutt, a man who runs the 40 yard dash in about 4.4 seconds and Sports Science talked about how the ostrich has much great ground forces than a human being and that's why it's able to run faster.

As one poster on another forum stated, ground forces work in golf as well. If somebody was trying to hit a golf ball while standing on a sheet of ice they wouldn't nearly hit it as far as a golfer trying to hit a ball while standing on a grass tee. Anyway, here's the Swing Heeler video.


For more info on the Swing Heeler, click HERE.


3JACK

Tuesday, October 27, 2009

3Jack's Translation of TGM: Part 9I


10-12 (Body Control)

The corresponding Chapter 7 Translation can be found HERE.

This section talks about the variations of pivot the golfer can use. Remember, Homer believed in a head centered tripod pivot. Here's a pic of the pivot Homer is talking about. The left pic shows a flawed pivot according to Homer and the right pic is the head centered tripod pivot.


STANDARD PIVOT - Stance Line and Plane Line are parallel to one another and the pivot freely turns back and forth.

SHORT PIVOT - Homer states that it is a freely turned backstroke pivot, but a restricted follow thru. Much like a 'punch shot' (full backswing, half follow thru). Homer states that the stance line should be closed (pointing to the right) in respect to the Plane Line.

DELAYED PIVOT - Restricted backstroke pivot with a free follow through. Used when stance line is open in respect to the plane line.

ZERO PIVOT - Zero pivot going back and thru. TGM instructors will often show an example of using a certain procedure or component while 'zeroing out' their pivot. What they usually do to zero out the pivot is they get both of their toes pointing inward at address. Homer Kelley states you can use the Zero Pivot with all stance line to plane line combinations.


10-13 (Shoulder Turn)

The corresponding Chapter 7 Translation can be found HERE.

STANDARD SHOULDER TURN - Homer says that the shoulder turn here is 'flat' on the backswing and 'on-plane' on the downswing.

FLAT SHOULDER TURN - A flat backstroke shoulder turn, but with the shoulder on plane on the backstroke. Then on the downswing the shoulder turn is very circular, but the shoulder almost irresistibly goes 'off plane.'

ROTATED SHOULDER TURN - It's very much what you see in today's golf swings where it's almost like a 'rotate back and rotate thru.' Homer states that the shoulder should rotate back so the shoulders are at a 90 degree angle to the spine. Basically the right shoulder can get on the Turned Shoulder Plane at the top of the swing and then shift 'On Plane' for whatever Plane Angle or Variation is used. Very good for a 'swinger' because Axis Tilt moves the Plane Line and Plane Angle and Homer states that you should use a Shiftless Hip Turn here. Also very important that if you use a Rotated Shoulder Turn, you need to get the waist bend exactly right to get the right shoulder on plane on the downswing.

ON PLANE SHOULDER TURN - Homer states that the Right Shoulder moves toward impact precisely on the preselected Downstroke Clubshaft Plane. When the shoulder can't quite reach the Plane, it is better to use a steeper plane. Here's a pic provided by Brian Manzella


As you can see, both Mr. Nicklaus and Mr. Nelson have their right shoulders going right down the plane line.

ZERO SHOULDER TURN - Basically used on short shots only and the golfer essentially uses the hands and/or cocks the wrists to execute the stroke.


3JACK

Monday, October 26, 2009

3Jack's Translation of TGM: Part 9H


10-11 (Pressure Point Combinations)

The corresponding Chapter 7 translation can be found HERE.

There are 4 pressure points.

#1 Pressure Point

The lifeline in the right hand where it touches the left thumb or the clubshaft. It is 'actively' used when 'hitting' and passively used when 'swinging.' Even with my right hand chop motion on the downswing, the #1 PP is a favorite of mine to use and the main goal for myself is for pressure on my left thumb to be at its maximum at impact.

#2 Pressure Point

The last 3 fingers in the left hand. Used by the 'swinger' who uses the 'Rope Handle technique.' This is the golfer imagining at the top of the swing they are pulling the club straight down, much like a person pulling the rope to ring a large bell from the medievel times.

#3 Pressure Point

The BASE JOINT of the right index finger. Here's Mr. Hogan explaining the #3 PP without even knowing that Homer Kelley called it such.


There was some talk on this blog of the pressure point moving, from the base joint to the middle knuckle, but it DOES NOT MOVE. In fact, it's very dangerous if the golfer tries to use the middle knuckle on the right index finger as the #3 PP because when you flip with the right hand, it's the right index finger that does the work, in particular the middle knuckle.

In fact, Mr. Hogan called the right index finger and right thumb 'swing wreckers' mostly because flippers usually have the pressure in the wrong part of the right thumb and right index finger which causes them to flip.

The rest of the #3 Pressure Point in this section has Homer talking about what Lynn Blake is discussing in this video.


So the #3 PP can be used by both hitters and swingers, they just have a different location as to where the #3 PP is in relation to the clubshaft.

#4 Pressure Point

The part of the upper left arm where it touches the left side of the body. Famous golf coach Jimmy Ballard teaches a 'left side connection' which is basically using the #4 PP to hit the ball.

This can be active for both the swinger (for normal swinger procedures) and for the 4-barrel hitter.

Usually the pressure point coincides with the power accumulator. Meaning, usually if you use the #1 Power Accumulator, then you use the #1 PP. However, there is some interchangeability that can be done here. Such as the #1 PP could drive the #2 PA if wanted. In that scenario, the #2 PA still has the same motion and application, it's just driven by the #1 PP instead of the #2 PP.


3JACK

Saturday, October 24, 2009

Club Championship Results Overview


Sorry I missed a couple of days with posts, but I just got off of playing in my club championship this past weekend. It was actually a 3 day event. Here's the stats:

DAY 1 - Windermere Golf Club (139 slope)
75 Score
11/18 GIR
9/13 Fairways
31 putts
2.0 Putts/GIR
3/6 Scramble
1 Three-Putt
2 Double Bogeys

It rained off and on throughout the round. The FootJoy Rain Gloves were excellent. I highly recommend them as they work great in the rain. I only wore the left hand glove as wearing both gloves felt uncomfortable and I'm not sure how Tommy Gainey does it. While it was raining and windy, the weather was pretty warm which didn't make it too bad. Struggled a bit with the irons, hit the driver pretty well.


DAY 2 - Olde Atlanta Club (139 slope)
76 Score
12/18 GIR
11/14 Fairways
35 putts
2.0 Putts/GIR
1/6 Scramble
2 Three-Putt
1 Double Bogeys

Very cold, windy and wet. The first hole there is 450 yards par-4 uphill. I hit Driver and a 3-hybrid, but wound up missing the green and then 3-putting for a double bogey. Too tentative and lacked confidence out there, but avoided double bogeys after that to keep my round a respectable score. I actually had the second lowest score that day (74 was the lowest). OAC isn't nearly as long as Windermere, especially after the 1st hole. After that, I had three 4-irons into approach shots, but everything else was usually between a 6 iron to PW.

DAY 3 - Windermere Golf Club (139 slope)
75 Score
13/18 GIR
9/13 Fairways
35 putts
2.0 Putts/GIR
1/5 Scramble
2 Three-Putt
0 Double Bogeys

A gorgeous day out with very little wind and I tied for the 2nd lowest round. The winner shot a 70 (-1) that day. Everybody else shot in the 80+. Started out striking the ball very well hitting the first 5 greens and sticking things close. A 3-putt on #2, combined with a poor chip that cost me a birdie on #3 didn't help matters. I birdied the par-3 #5 hole. Then hit a perfect drive on #6, only to miss a somewhat easy green with an 8-iron. I then hit a nice sand shot to 3 feet and missed the putt. So that puts me at +1. Then on #7, a par-3 I struggle on, I hit a decent tee shot off of the green and a weak chip causes me to go +2. Then I struggled with my driver from holes 8-12 and that sealed my fate. I then finished the round going:

- lipped out a 15 footer for birdie on #14
- lipped out a 10 footer for par on #15 (3-putt from 75 feet)
- Made a 30 footer for birdie on #16
- lipped out a 6 footer for par on #17 (3-putt from 30 feet over a ridge)
- lipped out a 10 footer for birdie on #18


STUFF I LEARNED

- The biggest things I need to improve are length off the tee and with the irons along with putting. While the statistics show differently, I really didn't putt that bad, I just couldn't get putts to fall to the point of it being a bit ridiculous (Day 1 & 3 were great examples). But where I was at a disadvantage was in driving distance. The last day I played with the winner and the guy that finished in 3rd place, each out-drove me by about 20-30 yards on average. The winner just graduated college and is turning pro next month. The 3rd place finisher is a former golf pro in his 40's. Recently there has been some talk about whether or not a golfer should considering hitting the ball with an upward Angle of Attack over at Brian Manzella's forum. The argument falls that some think that hitting upward with a driver will increase distance, but decreases the margine for error. Blog reader John Graham pointed out that if you can gain 30 yards off the tee and maybe miss 2 more fairways a round, which would you take? Interesting debate for sure. But I'm agreeing with John Graham at this point in time.

- Coming into the last day I figured that I would need about a 70 or 71 to make a run at the championship (I was in 3rd place by 5 strokes coming into the last day). I actually needed a 68 to tie. Anyway, I broke that down to needing at least 14 GIR, but probably 15 GIR to shoot that score comfortably. I kept thinking about the racing horse Secretariat winning the final leg of the Triple Crown by an amazing 31 lengths.


The one thing that caught me about this was people close to him and who followed him saying that his jockey, Ron Turcotte, just needed to 'let him run, let's see what he's got.'

That was my theme.

If I was going to go down, I was going to go down swinging. Great moments are born from great opportunity and you really can't have great moments playing tentative. All of the work you put in on the range and on the putting green should be so you can 'let him run' and see what you really have got. Otherwise, you're really doing a disservice to yourself and all the hard work you put into their game.


LOOKING AHEAD

- A big focus on improving power. I will try to do this from working on my swing, which will include:

1. Increasing hand speed
2. Maximizing Trigger Delay
3. Improving Pivot Action
4. Improving use of Ground Forces
5. Work with Trackman to check on clubhead dimension numbers, particularly Angle of Attack

This will probably included some equipment changes. I could see in several instances, with the ground being so wet, that my carry was pretty good. In fact, I would out-carry other competitors, but still get hurt in distance which is an indicator that my spin rate is too high (also partially due to AoA numbers).


- Putting will be worked on as well. Some more times with the SAM Puttlab. The only time I used the SAM Puttlab I had a different putter and different putting stroke. I will also get to understand how to find the Zero Points line and how to use it to my advantage.


- Lastly, I plan on taking about 30 pounds off. Hopefully this will improve my pivot, but I'm more interested in doing it to increase stamina as the tournaments I plan to play in next year (US Am, US Mid-Am qualifiers) don't allow carts (the courses I play have mandatory carts since they are impossible to walk).


Overall, not bad for a guy who quit the game for 8 years and just got back into the game in January. Furthermore, I had not played a legit singles tournament in 9 years and just came off of shanking the ball a week before. So this was a good way to assess my abilities and weaknesses and now to adjust to them. I appreciate everybody's kind words on the subject and would like to say again I could not have gotten to this point without Ted Fort's help.


3JACK

Friday, October 23, 2009

3Jack's Translation of TGM: Part 9G


10-10 (Hinge Actions)

The corresponding Chapter 7 Translation can be found HERE.

I would first recommend looking at this picture to understand the basic hinge actions in the golf swing according to TGM.


Pic 1 = Angled Hinge
Pic 2 = Horizontal Hinge
Pic 3 = Vertical Hinge

Also, check out this Lynn Blake video with VJ Trolio on the various hinge actions.


HORIZONTAL HINGE - This is primarily used by golfers who use a 'swinger' procedure. When executed correctly, the clubHEAD will down the target line, but the clubFACE will be facing as such so the toe of the club is pointing at the target. Thus, the face has to close and creates that 'full roll' FEEL.

ANGLED HINGE - This is primarily used by the 'hitter' although the swinger can use angled hinge. When executed correctly, the clubHEAD will be down the target like and the clubFACE will be at about a 45 degree angle to the target. This is a 'natural byproduct' of the right arm thrusting (thus, why it's usually used by hitters) and creates a 'no roll' FEEL.

VERTICAL HINGE - This can be used by either the hitter or the swinger. However, you should only use vertical hinging on short shots. The 'cut shot' in TGM terms is ANY SHOT that uses Vertical Hinging. Technically a golfer can rip a 15 yard hook with a driver and still be a 'cut shot' by TGM terms as long as they use vertical hinging. I believe one can really help their short games by understanding the vertical hinge so they don't have to rely on hitting flop shots every time they need some loft and for the ball to stop on a short shot.

In the vertical hinge, the clubHEAD should be down the target line and the clubFACE should be pointing straight up at the sky.


3JACK

Thursday, October 22, 2009

3Jack's Translation of TGM: Part 9F


10-9 (Address)

The corresponding Chapter 7 translation can be found HERE.

This part just deals with the position of the body and hands at address.

STANDARD ADDRESS - Hands are 'mid-body' and body is 'square' to the target. Right wrist is Flat, Level, and Vertical (F/L/V) and the Left Wrist is Bent, Level and Vertical (B/L/V). These wrist positions are the direct opposite at impact.

Homer states that this is a good address position for somebody who wants to use the 'Lagging Clubhead Takeaway.' Nicklaus used a lagging clubhead takeaway. Here's a Brian Manzella video discussing the lagging clubhead takeaway.


IMPACT ADDRESS - This address position has the body and hands at the same position they would be at impact. The golfer that uses this address position usually just tries to 'return to the address position' at impact.

HALF AND HALF ADDRESS - So the body is in the impact position at address, but the hands are at 'mid-body.'

SPECIAL ADDRESS - The body, which includes the feet, knees, hips and shoulders are aligned 'open' to the target. The hands are at mid-body hands. Homer states that this will limit the backswing a bit, but unrestrict the follow thru and require a push motion by the golfer. I guess Lee Trevino would be considered a 'Special Address.'


I skipped 10-8 because it's very much the same deal, except talking about 'impact fix' instead of address positions. But I found it a bit redundant.


3JACK

Some Young Moe Norman Swings

Roll your eyes with me after watching these swings when somebody tells you Moe didn't hit the ball very long.


3JACK

Tuesday, October 20, 2009

3Jack's Translation of TGM: Part 9E


10-7 (Plane Angle Variations)

The corresponding Chapter 7 Translation can be found HERE.

Plane Angle Variations are about what plane(s) the golfer swings upon. In the previous translation post we talked about the various plane angles the golfer can use. This post deals with whether or not the golfer changes planes and what plane changes they make. It's similar to Jim Hardy's 'one plane vs. two plane' swing, but it's not made nearly as important as Hardy makes it and there's different types of 'one plane and two plane' swings. Homer Kelley calls changes in the plane 'shifts.'

ZERO SHIFT - Golfer stays on one basic plane angle throughout the swing. Whether it be the Turned Shoulder Plane, Elbow Plane, Turning Shoulder Plane, etc.

SINGLE SHIFT - There's only one shift here and Homer is particular about what shift occurs. The golfer goes from the elbow plane to the TSP in the backswing and then stays on the TSP in the downswing. I have a 'Single Shift' swing.


Popular instruction would claim that my downswing is very 'steep', but the Angle of Attack actually is not that steep and I'm very much on plane in those swings.

DOUBLE SHIFT - There are two shifts here, but in particular the golfer goes from the elbow plane to the TSP in the backswing, then shifts again BACK to the elbow plane. Contrary to Moe Norman swing advocates, Moe had a clear double shift in the swing and is not a 'single axis plane' golfer.


The double shift I find to be very common on the PGA Tour. It allows the golfer to better eliminate the possible Over the Top move and thus when most PGA Tour golfers struggle with swing plane, it's usually getting too far under plane.

TRIPLE SHIFT - Shifts from elbow to TSP in the backswing, then shifts to a very vertical downswing stroke by getting to the Turning Shoulder Plane. I tried to figure out what golfer uses a triple shift and could not find one.

REVERSE SHIFT - It's a 'Single Shift', but in the opposite direction. So the golfer goes up the TSP on the backswing, then shifts to the Elbow plane on the downswing, very much what Tiger is doing right now with his swing.

THE LOOP - Like the single shift in that the golfer starts at the elbow plane, but moves to the Squared Shoulder Plane. This requires a very flat shoulder turn. Not a very advisable Plane Shift to use and to pull it off, you have to 'loop' the clubhead over to the Squared Shoulder Plane.

THE REVERSE LOOP - Golfer goes up the Squared Shoulder Plane and then down to the elbow plane. You could argue that Fred Couples uses a 'Reverse Loop' although I believe he uses the Turning Shoulder Plane on the backswing instead of the Squared Shoulder Plane. Still, the concept is similar.

THE TWIST - Golfer lifts either the wrists or the left arm vertically and straight back so they get on the Turning Shoulder Plane. They then come down vertically on the Squared Shoulder Plane. Homer Kelley states that the golfer has to have flat shoulder turn on the downswing to execute the 'Twist.'


3JACK

Monday, October 19, 2009

A Look At Some Upright Basic Plane Angles

Dipping a little further into the Basic Plane Angles, here are some more upright plane angles used in the backswing by some famous golfers. Most are on the turned shoulder plane, some are on the squared shoulder plane and some are on the turning shoulder plane. This pics was provided by Brian Manzella over at his Web site.


3JACK

Sunday, October 18, 2009

3Jack's Translation of TGM: Part 9D


10-6 (Basic Plane Angles)

The corresponding Chapter 7 Translation post can be found HERE.

There are three 'fixed' basic plane angles, one moving plane angle and one moveable plane angle, each are named for its particular reference point.

Here are the 3 most popular basic plane angles (thanks to Jeff Mann at Perfect Golf Swing Review for the pic


ELBOW PLANE - Homer states that this is a very flat angle of attack on the downswing and should be avoided on shorter shots UNLESS you naturally use this on your full shots. Very popular downswing plane for PGA Tour pros which usually makes it rare to see them come over the top, but the 'miss' is usually the golfer coming too far under plane.

TURNED SHOULDER PLANE - Very common for most golfers to reach the turned shoulder plane at the top of the swing. Homer states:

This Plane Angle has far better performance characteristics than any other because any Plane Angle Shift is very hazardous
A 'plane angle' shift happens when the golfer goes from one plane angle to another. Let's say they go from elbow to turned shoulder, that's a 'plane angle shift.' Homer believed this was hazardous, but seemed to change his mind after the book was published. Here's a pic of Jack Nicklaus and Byron Nelson.


Mr. Nelson 'shifts' his plane angle on the downswing (going from the turned shoulder plane to the elbow plane). Mr. Nicklaus does not shift, staying on the Turned Shoulder Plane.

Most PGA Tour players have a shift, usually to the elbow plane on the downswing. Most 'hitters' tend to stay on the TSP (turned shoulder plane). Swingers tend to get back down to the elbow plane. Now, Mr. Nicklaus was a 'swinger' and stayed on the TSP, but like I said this is a *tendency.* And a lot of it has to do with the type of elbow position the golfer uses (pitch, punch or push).

SQUARED SHOULDER PLANE - A bit like the TSP, but the line is drawn from the ball to the 'top edge' of the right shoulder instead of thru the middle of the right shoulder. This is a steeper plane than the TSP and Homer notes that if you use the steeper Squared Shoulder Plane with an Angled Hinge, the Angled Hinge Action almost becomes a Vertical Hinge Action. You want to avoid vertical hinge action with full swings.

Thusly, if you use Angled Hinge action, you need to work on a flatter plane than the Squared Shoulder Plane. Or if you want to use the Squared Shoulder Plane, you better use horizontal hinge.

TURNING SHOULDER PLANE - Homer states that this plane is 'undoubtedly the most widely used Basic Plane.' I agree, but you need to keep reading as to what he means by that.

But first, let's describe the Turning Shoulder Plane.

The Arms are simply raised and lowered vertically and the Wrists are Cocked and Uncocked with the Left Wrist Vertical to the ground at all times (remember, this is from the DTL view). There is a pivot involved even though the arms are simply raised and lowered vertically. Fred Couples is a good example of a golfer using a Turning Shoulder Plane on the backswing.


The reason why Homer says this plane is so widely used by golfers is that they try to take the clubhead 'straight back' from the ball and then 'straight down to the ball' at impact.

There are two versions of the Turning Shoulder Plane:

1. Vertical Wristcock Turning Shoulder Plane (already desscribed)
2. Vertical Left Arm Turning Shouler Plane

The Vertical Left Arm version is much like the Vertical Wristcock version, except the golfer takes the arms straight back and straight thru. I believe this is the version Fred Couples uses, but I could be mistaken.

HANDS ONLY PLANE - This is in the picture at the top of the post of Aaron Baddeley. If you want to return your hands at impact to the 'hands only plane', that can serve the golfer very well.


3JACK

Saturday, October 17, 2009

Latest Lesson With Ted Fort

I had been struggling a bit lately, but still getting things to come around and still shooting some respectable scores. However, 'Black Monday' mysteriously hit. And by 'Black Monday' I mean 'Shank Monday.'

Essentially I knew the problem, I was 'coming over the top' or in TGM terms "getting above plane" which would lead to 'steering' (something I will go over in future TGM translation posts). This would also lead to a lot of loss in lag pressure at impact.

And behold, after one swing, he fixed what ailed me.

Now THAT is teaching.

According to Ted, the address position, backswing, clubface in the backswing and at the top of the swing all looked good. Hip motion in the backswing looked good as well. So, what was the problem?

We first started talking a bit and discussed a facet of the swing that is also described by Lynn Blake about the 'hitter' motion in this video.


Lynn talks about the 'hip slide' and the 'S-L-O-W' startdown for the hitter. Basically the S-L-O-W startdown for the hitter allows then to slide those hips first.

This is, from what I gather, a big part of the Stack and Tilt Method. They want the hips on the downswing to slide for a big chunk of the downswing, then eventually rotate.


Remember, the Stack and Tilt is very much based off 'The Golfing Machine' (all S&T guys will tell you that as well) and Homer Kelley talked about on the downswing the right shoulder has to be on plane. If it's not on plane, then you should check the axis tilt (a big part of the 'Stack and TILT'). The axis in this case is the spine from the Face On View. When Homer Kelley talked about getting axis tilt on the downswing to get the right shoulder on plane, he was talking about the spine from the Face On view tilting AWAY from the target. From what I gather about the S&T methodology, they want the axis either perfectly vertical or very slightly tilting towards the target in the backswing and then the hip slide tilts the axis away from the target and gets the right shoulder on plane (I will be getting the S&T book in November).

Lastly, Homer Kelley also talked about the right shoulder should look like it's moving 'down and stay back' on the downswing.

All that was actually a minor part of what we worked on. The main part we worked on was a downswing move to get that right shoulder on plane by itself. According to Ted, in the 6th Edition of 'The Golfing Machine', there included a part where Homer talks about the HITTER making a karate chop motion with their RIGHT ARM on the downswing. In the past I've talked about a 'swinger' making a 'karate chop' motion with their left hand on the downswing. This is the same type of idea, but the hitter actually makes the karate chop motion with the right hand (the side of the hand where the pinky is actually 'chops' into the ball).

This can actually get the 'hitter' into a 'pitch elbow' position, which I discussed in a recent translation post. If you want more power, you just keep 'delaying the karate chop' and that keeps you from 'running out of right arm.' Probably nobody had more 'right arm' at impact than Mr. Hogan.


After that we worked on the release point and me working on club rotating in the release point. As we discussed it may feel like a horizontal hinge to me, but it's actually an angled hinge because my tendency to steer the clubface open does that.

We eventually got to talking about equipment and how my shafts need to be a little longer since I am so hunched over at address. Ted introduced me to Mizuno's new 'Shaft Optimizer Tool' which is really neat.


Basically this is a tool hooked up to a Mizuno club fitting 7-iron. You simply just hit some shots with the club and then it reads out the clubhead speed and then 4 different numbers (not sure exactly what those numbers mean) and then they can give you a variety of shafts you can use. For example, I was interested mainly in the KBS Shafts and it stated that I should get the KBS Tour Stiff-Flex soft tipped once. But if I wanted the True Temper Dynalite or the Rifle Project X shafts, I could get those as well. Here's what Golf Magazine noted about the Shaft Optimizer

Getting the best shaft for you game can be a lengthy process of trial and error. Mizuno's "shaft optimizer"—a standard 6-iron with a proprietary device affixed just below the grip—eliminates the guesswork. The unit, which consists of a microprocessor with strain gauges and accelerometers, measures clubhead speed, swing tempo, shaft droop (toe down), forward bend (kick angle), and release factor (based on either a handsy or a body swing). It then recommends three shafts (based on flex, weight and bend profile) for you to test during a fitting session. The tool works in tandem with Mizuno's newly released interchangeable iron fitting system (27 heads; 44 shafts).
I then hit some of the KBS shaft with their interchangeable iron fitting system and liked what I saw. Particularly strong on mis-hits. I'll probably try to get some new shafts in my irons next Spring.

That just about ended my lesson session with Ted. For those who are interested, here's Ted's Web Page at the Marietta Golf Center.


3JACK

Thursday, October 15, 2009

3Jack's Translation of TGM: Part 9C


10-4 (Stroke Types and Variations)

The corresponding Chapter 7 translation can be found HERE.

This is pretty easy. Stroke Types are classified according to the number of Power Accumulators used.

Single Barrel = One Power Accumulator
Double Barrel = Two Power Accumulators
Triple Barrel = Three Power Accumulators
Four Barrel = Four Power Accumulators.

Homer believed that the 'swinger' could only 'max out' to the triple barrel swing because they should not use the #1 power accumulator (folding and straightening of the right arm). So, according to HK the 'hitter' is the only golfer who can possibly have a 4-barrel stroke. But Homer stated this about the 4-barrel hitter:

This high performance Four Accumulator Combination can produce many problems during its mastery by the player. But it can make the difference in top competition. Well controlled Double or Triple Barrel Combinations have little to fear from the Four Barrel Combination that is less than fully mastered.
Here's a video of John Erickson, a 4-barrel hitter.


10-5 (The Plane Line)

The corresponding Chapter 7 Translation can be found HERE.

The general concept of the 'plane line' is that first you want to swing 'along the lines' of your body. So, if you have your body positioned to the right of the flag stick, the general idea is to take the club back and thru along where your body is pointed (in this case, out to the right). The plane line is the base line of the inclined plane. Here's a diagram showing the inclined plane board and notice the plane line at the bottom of the board.


In the diagram above, the plane line is in the same direction as the ball of flight. But again, that's not always the case. Sometimes the plane line can be right of the line of flight or left of the line of flight. That's what 10-5 deals with, the direction of the plane line (where the body is aimed, thus the club/plane line goes in the at direction) and the direction of the clubface.

SQUARE-SUARE - Clubface is square to the target, Stance is square to the target so the plane line can be square to the target. Standard stance for somebody who wants to hit it straight. However, with what we know about D-Plane, that puts a little bit of a twist into that formula.

SQUARE-OPEN - Square clubface, stance is open (so plane line is open/pointing to the left. With what we know about D-Plane, this is more of the stance you want to hit irons straight.

SQUARE-CLOSED - Square clubface, stance is closed. With what we know about D-Plane, *IF* you can managed to hit upward with the driver, then SQUARE-CLOSED will help you hit the driver straight.

OPEN-OPEN - Both face and stance are open. Meaning face is pointing right of the target, but the stance is pointing left of the target.

CLOSED-CLOSED - Both face and stance are closed. Meaning face is pointing left of the target, stance is pointing right of the target.


3JACK

Wednesday, October 14, 2009

3Jack's Translation of TGM: Part 9B


The corresponding Chapter 7 Translation of this post can be found HERE.

10-3 (Strokes - Basic)

This section goes over the elbow positions and then the arm positions in the golf swing.

The Elbow Positions are mostly for the Full Swing. They can be for the 'Acquired Motion' (9-3 swing) or a 3/4 swing or a punch shot, etc.

The Arm Positions are for less than full strokes. Mostly applies to chipping and putting.

There are 3 different Elbow Positions for the 'Major Basic Stroke.'

PUNCH ELBOW - These elbow positions are on the DOWNSWING. Punch elbow sees the right elbow 'down-and-at-the-side' of the right hip. Here's a pic of me using punch elbow.


Punch Elbow is normally a 'hitter' component. Homer says that the right forearm in a swing that uses punch elbow must have a fanning type of motion. Below is a diagram showing a fanning forearm.

Homer also states if you want to increase your trigger delay using punch elbow, you need to use Hip Slide or Hip Turn. This Lynn Blake video goes a bit into it.


PITCH ELBOW - Here, the right elbow is 'down-and-in-the-front' of the right hip. Most PGA Tour golfers use pitch elbow.


Pitch Elbow is typically a swinger component, but hitters can push from pitch elbow. In fact, the picture above is of John Erickson, a confessed 'hitter.'

To accomplish pitch elbow, Homer talks about the Right Forearm making an 'underhand pitch' and 'is delivered at the Aiming Point with a stiff-wrist slapping motion.'

Homer states that pitch elbow is more condusive to greater Trigger Delay, especially for Snap Releases.

PUSH ELBOW - The right elbow is in an 'up-and-out' position which keeps the Hands always between the elbow and ball.

With pitch and punch elbow, it goes 'ball-elbow-hands.' With push elbow it goes 'ball-hands-elbow.'

It is a hitting component. Push elbow is use for hitting for less than full power. A golfer may want to use push elbow because they like to set up with 'impact hands' at address and then concentrate on maintaining the right forearm flying wedge throughout the swing. This can produce a flat left wrist time and time again and make the ball go very straight and a little lower. I like to hit my punch shots into the wind using this method. Here's a good video showing a golfer using a hitter procedure with 'impact hands' and push elbow and just using the right forearm with a piston like action in the backswing and the downswing.


ARM MOTIONS (MINOR STROKES)


PULL ARM MOTION - Club is being accelerated with either arm, but ALWAYS with a 'rope handle' procedure. It is always a 'swinging' method.

PUTT - Completely motionless body, especially the right shoulder. You *can* putt with the putt arm motion. But you can also putt with different arm motions as well.

PECK - A 'wrist action only' arm motion. Think Arnold Palmer's old putting style.

PICK - Both arms are bent at about a 45 degree angle. The arms look like a diamond shape from the Face On View.

PAW - Both arms are 'frozen.' However, they can either be frozen bent or frozen straight. Very common in putting strokes.

PAUSE - Sort of like the 'peck' arm motion where it is a 'wrist action only' stroke. But the 'pause' arm motion calls for the left hand to stop (or 'quit') and that causes the left hand to become the center of the Clubhead impact arc. The book has a pic that sort of explains it, although I've never seen it being executed to effectively strike a ball.

BAT - I *believe* this is just the right arm moving in a 'piston' like motion. You can use this on all minor strokes, including putting. This is a 'hitting' procedure. Most putting strokes are 'swinger' procedures, but there are some good putters that have used this 'Bat' arm motion. I believe Nicklaus qualifies for a 'Bat' Arm Motion. However, if you want to use this hitting, piston-like motion with your putter, I highly suggest moving the ball up in your stance as you don't want to hit down on the ball with the putter. I find the piston like arm motion to be very helpful for golfers using a 'Claw' Grip or the 'Saw' Grip.

In fact, there's an article by John Furze (GSED) discussing the piston like action and 'no shoulder movement' putting stroke that Homer Kelley used. The article can be found HERE. Here's a pic of the address position Furze uses for this stroke. Notice how the ball position is moved up front.


3JACK

Tuesday, October 13, 2009

3Jack's Translation of TGM: Part 9A


10-2 and it's corresponding Chapter 7 Translation can be found HERE.

10-2 (Grip Types)

Grip types are about the 'direction' of the hands, and if the grip is 'strong' or 'weak' along with the position of the wrists, the left thumb and the #3 Pressure Point.

WEAK SINGLE ACTION V/V/T - Both wrists are vertical to the ground (as noted by the V/V) and the left thumb and the #3 PP are on top of the shaft (noted by the /T) as much as they can be on top of the shaft without losing the position of the vertical right wrist. Thus the notation of V (Vertical Left Wrist)/V (Vertical Right Wrist)/T (#3 PP and thumb on top of the shaft)

STRONG SINGLE ACTION V/V/A Both wrists are vertical, but the left thumb and the #3 PP are on the 'aft' side of the shaft (aka the side of the shaft that is away from the target). Here Jeff Evans demonstrates the Strong Single Action grip.


WEAK DOUBLE ACTION V/R/T - Vertical Left Wrist, Right Wrist is rolled to the to the top of the Clubshaft so that the Right Wrist Bend will be on the same line as the Left Wrist Cocking Motion. So, if you were to grip the club and cock the left wrist upward, the right hand has to be rolled over to the top of the shaft so that the 'V' in the right hand is in the same line as where the left wrist would cock upward. It's probably arguable, but I believe Hogan had a Weak Double Action Grip.


STRONG DOUBLE ACTION T/V/A - Left Wrist is turned to the top of the shaft and the right wrist is vertical. Left Thumb and #3 PP are on the aft side of the clubshaft. This makes the left wristcocking motion so it is inline with the right wrist bent. This is the type of grip that 'shows 3 knuckles' in the left hand.

Homer states this grip is 'very compatible with Cut Shot procedures.' Remember, a cut shot is ANY shot that uses vertical hinging. Even if it is a full swing with a driver that has a draw trajectory (albeit difficult to do precisely with vertical hinging).

WEAK DOUBLE ACTION UNDERHAND V/T/U - Vertical left wrist, Right wrist is turned so it is 'strong.' So strong that the #3 PP is UNDER the clubshaft. Bit of a unique grip to see from a golfer.

STRONG SINGLE ACTION UNDERHAND T/T/U - Both wrists are turned, very strong grip with the #3 PP under the clubshaft.


3JACK

Monday, October 12, 2009

3Jack's Translation of TGM: Part 9


Part 9 of the TGM translations will go over Chapter 10 in the book despite the List #2 directing the reader towards Chapter 3.

Whereas Chapter 7 gives a general overview of each of the 24 Basic Components of the golf swing, Chapter 10 goes more into detail and discusses each variation of each Component. There 3-15 variations of each Component.

10-1 (Basic Grips)

General overview of the Basic Grips can be found HERE.

OVERLAPPING


Furyk uses a double overlap which Homer Kelley discusses to a degree here. 'Any number of the last fingers of the Right Hand may overlap any number ofthe first fingers of the Left Hand.' Homer states that increasing the amount of overlap diminishes the leverage of the Right Hand.


BASEBALL - Homer notes that with the baseball grip, if you increase the distance between the hands (split grip), it also increases the support from the right hand. However, if decreases the clubhead acceleration, which is hugely important because....Force = Mass * Acceleration.


REVERSE OVERLAP - The opposite of the overlap grip. In fact, increasing the overlap diminishes the leverage of the LEFT hand.


INTERLOCKING - Nothing new here, left index and right pinky interlock with each other.


CROSS HAND - Yes, Homer discusses the Cross Hand grip in TGM. Think it's an impossible component to play highly competitive golf? Tell that to Josh Broadaway.

Homer states the hand positions are reversed and using this grip means that the Right Arm Action cannot overpower the Flat Left Wrist at impact. Basically if you use Cross Hand grip, then you can either use an Overlap, Baseball, Reverse Overlap, Interlocking with the Cross Handed, but no other exceptions.


3JACK

Sunday, October 11, 2009

3Jack's Translation of TGM: Part 8I


7-21 (Power Package Assembly Point)

This is basically where the Primary Lever Assembly is formed in the golf swing.

Take a look at Mr. Nicklaus' and Mike Maves' positions at the top of their respective swings.


Mr. Nicklaus has his Primary Lever Assembly in tact when his hands are well above his head. Maves has his Primary Lever Assembly in tact when his hands are about level with his right shoulder. That's what the 'Power Package Assembly Point' is all about.

Different types of Strokes, conditions, purposes and personal preferences tend to change this point around.
and

To attempt variations on the basis of just one 'Feel' produces improper alignments and relationships. So conscious differentiation must be practiced.
The first quote basically states that your Assembly point will likely change with different types of strokes. My Assembly Point with my driver is usually far different than it is with say a Pitching Wedge. Just because there are some variations in the Stroke being attempted.

If you want to change your Assembly Point from say a Mike Maves style to a Nicklaus style, you really shouldn't do it with the same type of swing 'thought' or swing 'feel.' Instead, you should practice the different Assembly Points and be aware of the differences in feels so you can execute the different Assembly Points with good alignments.


7-22 (Power Package Loading Action)

The Power Package Loading Action takes place in the backswing and it's how the golfer goes about cocking their wrists in the backswing and loading their power. There are 3 different types of Loading Actions:

1. Full Sweep
2. Random Sweep
3. Snap

Basically you 'load' the Power Accumulators so you can propel them toward impact. The amount of loading can either be controlled by the speed of the entire motion and/or by the sharpness of the specific procedure.

To give an idea (I'll go into the specifics of all of the 3 types of Loading Actions later on), let's take a look at Lucas Glover's swing.


Lucas has a 'Snap' Loading Action. See how he takes it back and has very little left wristcock. That's the 'Snap Loading Action.'

He also has a 'Snap' Release. This is very good because you want to match the loading action and the relese if you possibly can. A lot of golfers will try the 'Snap Loading Action', but cannot get the Snap Release.

Per Endless Belt (2-K), the smaller the 'pulley', the slower the hands can be. Snap releases have a very small pulley, thus they can have slower hands on the downswing, but still generate a lot of clubhead speed.

This also applies to the Loading Action. Glover has the Snap Loading action, thus he is very slow with the backswing in order to execute a precise Snap Loading action.

Homer also notes the Assembly Point and Loading Action and how they can work with each other. If the golfer has an Assembly Point like Nicklaus', then they have a lot of time to start loading the club on the backswing before they reach their Assembly Point. It's no coincidence that Nicklaus had a Snap Loading Action and has a similar Assembly Point to the one Glover has.

On the flip side, somebody with Maves' Assembly Point needs to load the club a little quicker.


7-23 (Power Package Delivery Path)

This is about the shape of the path the hands take from the top of the swing to impact looking at the golfer from the Face On viewpoint. There's actually 5 different paths:

1. Straight Line
2. Circle
3. Angled Line
4. Top End Straight Line
5. Top End Angled Line

The Top End lines (#4 and #5) are just when the hands are up above the head at the top of the swing and then either make a straight line or angled line delivery path to the ball.


7-24 (Power Package Release)

There are 5 different types of Power Package Releases:

1. Full Sweep Release
2. Non-Automatic Random Sweep Release
3. Automatic Random Sweep Release
4. Non-Automatic Snap Release
5. Automatic Snap Release

These can be defined as Release 'type' and Release 'point.' Automatic and Non-Automatic are the Release 'type.' Full Sweep, Random Sweep and Snap are release 'points.'

Again, I'll go over these in more detail in later translation posts.


3JACK

Friday, October 9, 2009

3Jack's Prep for Tourney Play

Next week I have the Club Championship coming up. They changed it from 36 holes to 54 holes, Friday will be at Windermere GC, then Saturday at Olde Atlanta Club, then back to Windermere GC on Sunday. I thought it would be useful to some readers to give my insight on how I will approach the tournament.

My plan is to practice a little each day for a week leading up to the tournament. I'll probably get 3 more rounds in before the tournament, hopefully two more at OAC (since I don't play there that often). Usually my practice will consist of at least 1 hour hitting balls. I'll switch between even numbered and odd numbered irons each day, but I always make sure to practice with my 3-hybrid, my 3-wood and Driver since they can be used quite often in a round. Plus, if I'm on with the hybrid that usually becomes quite a weapon for me.

So the practice will look something like this:

1 hour hitting balls (finishing the session hitting 14 good drivers)
15 minutes chipping
30+ minutes working on green speed
30-45 minutes working on putting routine and sinking putts

The last two rounds before the tournament I will have what's called 'simulation' where I simulate a real tournament as best as I possibly can. That means showing up 2 hours early to practice and get in the groove, play the tournament tees, putt every hole out, and to take every shot just as I would in the tournament.

It's not so important to keep score in practice rounds, even in the 'simulation' practice rounds. That's because I want to concentrate on goals that I have for the Tournament, which have nothing to do with shooting a score or even winning the tournament. Here are those goals:

- Hit 40 out of 56 greens in regulation
- No double bogeys or worse
- No 3-putts
- No peaking (moving heads on putts)
- Use your pre-shot routine for every single shot
- Have fun out there

So with the simulation practice round, I'll basically show up 2 hours early before the tee time, just like I would for the tournament. Spend 1 hour hitting balls, 10 minutes chipping and 50 minutes on the practice green. Then my goals for the round are to hit 14 GIR and the rest of the goals listed above. After the simulation round, I look at my goals and try to figure out why I didn't reach them. Also, don't play these simulation practice rounds by yourself. In fact, the slower the pace of play on the course the better because come tournament time the pace of play will be much slower than you are used to playing and getting around that can be difficult. Again, you want to simulate what you can as close as possible to the real tournament. So if you're stuck behind the slowest foursome on the course, that's actually better for your preperation.

You may find this to help you as well. For instance, in my first simulation round, I went with chipping and putting first and then went to the range and started out very slow, but got the round back and shot a 75. In my second simulation I changed up the order of the practice by going with the range first, then chipping and putting, then back to the range for about 5 minutes.

I've charted the greens, but I also make notes. I try to get each hole to 'fit my eye' off the tee and have spent quite some time making sure to find the proper targets so I can hit at precise shots. I also make note of what side of the tee I will tee off and what clubs to hit from certain yardages.

Here's a sample of my notes:

#1 WGC - Tee Left, aim at 150 marker. Pin Front or Middle, Take xtra club. Pin in back, take 2 xtra club.

#2 WGC - Left side green breaks towards ladies tees. Right side green breaks towards #8 green. Anything short, chip w/1 less club (uphill lie)

#5 WGC - Aim at the fan (behind the green), knockdown a 6-iron.

#13 WGC - Tee left aim at white porch. Xtra club to green.

#16 WGC - 5-iron off tee, take note of pin position. 70-80-90 for back-middle-front pin positions for optimal SW shot.

#2 OAC - Lower tee w/driver. Tee left aim at birch tree. Downhill Green only -4 difference in slope. Putts below the ridge break left, above ridge break right.

#5 OAC - Tee left, aim at chimney. 100 yards w/SW gets to front pin position. 1/2 PW from 100 yds to back pin position.

#10 OAC - Tee left, lower tee, aim at 150 marker. Decline only -6 yards.

#12 OAC - Tee right, aim at tree behind bunker. 4-iron should get to 85 yards.

#18 OAC - Tee right, aim at back deck. Go for two only in optimal conditions. 5-iron to 70 yards. Shots to green kick hard right.

So come in to tournaments like it's something you've done so many times you can do it your sleep and that will relieve some of the anxiety involved.

Lastly, be prepared.

This means having the towels (a dry towel and a damp towel), the golf balls, tees, gloves, rain gloves and umbrella (if necessary), food, markers, ball mark repairer, etc.

If you're mentally and physically prepared for the tournament and set your goals where you're not focusing so much on score but on the process to shoot good scores, then you'll likely be more successful in the end.


3JACK

Some More Rule of 12 Thoughts...

Recently I talked about Brian Manzella's video on the 'Rule of 12.' Here again is the video.


I've made a follow up post on the Rule of 12 which can be found HERE.

First off, I will reiterate that I think this is extremely important to learn. For myself, I'd say my up-and-down % using one club (usually the SW) was around 50-60%. Now understanding the Rule of 12 and being able to execute the shot, I'd say my up-and-down with this is about 70-80%. Huge difference.

Here's some more things I've found out about using the Rule of 12.

1. Practice, practice, practice.

Actually, you don't have to practice this a ton, but getting the technique down is a little harder than I thought. Mainly because using a chipping stroke with a SW is a little different of a feel than using it with say a 7-iron. At first, I think you need to put some solid amount of practice with it just to get down the technique, the carry and the roll. But once you start to get it down, just practice it for about 5-10 minutes every time you go to the range. And as I mentioned in a previous post, this is a GREAT way to help figure out the speed of the greens. If you can find a relatively flat spot on the practice green to chip to, use the Rule of 12 and if after a few strokes you find correctly executed Rule of 12 shots are going well short of the cup, then you probably have slow greens. If you are going well long, then you probably have faster greens. You also need to make the adjustment on the golf course. If you find that the greens are 1 club too fast, then take 1 less club according to the Rule of 12 when you play your round out on the course. I make the Rule of 12 part of my practice routine and my pre-round routine when playing in tournament play.


2. Be Aware of Your Lie

One big thing I've noticed is how the lie effects the shot. If you have an uphill lie, you're likely to hit the ball past the safe zone because the chip swing needed to hit the 'safe zone' from a relatively flat lie. So, you may want to either take 1 less club if you have a fairly uphill lie or take a shorter stroke so you won't fly past the safe zone.

Downhill lies are a bit more tricky. You may want to take less club and adjust where you put the 'safe zone.' The main reason is that downhill lies tend to go so low that they don't reach the safe spot. But if you take a longer club, you're just decreasing the loft. The longer swing doesn't mean that you will get extra loft either. So I say you may also want to take 1 less club here so you can get more loft and just adjust your 'safe zone.'

So, if I have a chip shot that is 30 yards long with a downhill like and my carry to the safe zone is 10 yards and my roll is 20 yards, that is saying that I need a PW. But instead, I may want to go with a SW to get some more loft and adjust my safe zone to about 15 yards of carry so I will only have 15 yards of roll, thus according to the Rule of 12, calling for a SW spot.


3. You Don't Always Have to Land On The Green.

One of the reasons why the Rule of 12 appealed to me was going back years ago to watching the old Senior Tour Championship at the Dunes Golf Club in Myrtle Beach. I can't remember the pro who hit the shot, but he short sided himself and had a chip that was at the bottom of the hill. Instead of hitting a difficult flop shot, the pro just hit a bump and run up the fringe and put it to about 3 feet and made the putt. I thought that was the smart play, but simply didn't have an idea of what club I would hit there on the bump and run. Now, with the Rule of 12 we have an idea.

Fast forward to about 2 weeks ago where I had a slightly downhill lie and short side myself to a two-tiered green. In the past I would've hit a LW and the Rule of 12 using the 'safe zone' on the green would've called for a LW. Instead, I found an area I wanted to hit that was short of the green. The Rule of 12 called for a PW, but with the ball landing on the fringe and the slope going uphill, I pulled out a 9-iron to that safe zone spot and left myself with a tap in.


Again, all stuff that can be more easily understood and more consistently executed with practice. But as AimPoint Golf statistical studies have shown, Scrambling % has the 4th highest correlation to Stroke Average. So if you can greatly improve your Scrambling %, it will impact your handicap.


3JACK

3Jack's Translation of TGM: Part 8H


7-20 (Trigger Types)

Homer denotes the term 'trigger' as meaning the action which initiates the Release of the Power Package Assembly of Power Accumulators. So 'maximum trigger delay' means that the golfer is delaying the release of the Power Package Assembly of Power Accumulators as late as possible. Sergio is a great example of having 'maximum trigger delay.'


Homer notes that trigger types will be called 'throws' whether they actually 'throw' or are 'thrown.' Trigger Types are selected according to Release Type (snap release, full sweep release, random sweep release) and Release Point.

Hitters require an Active Right Elbow and an inactive Left Wrist.

Swingers require an Active Left Wrist and an inactive Right Elbow.

Regardless if the Right Elbow or Left Wrists is active or passive, their motion and relationships are not visibly altered. In fact, right elbow position is still always key, even for the swinger. Here's pics of Snead (swinger) and Trevino (hitter) at impact. Notice how their elbow positions are in the same position despite having different trigger types.


The Right Elbow is a powerful part of the body to sense and feel throughout the golf swing as not only can it help with Maximum Trigger Delay, it can help keep the golfer on plane. There's often the instruction that you should feel like the golf swing is like skipping a stone across the water. If you do that, you will notice that your right elbow gets close to your right side on the downswing. The harder you want to throw the stone and get it to skip more, the later you allow that right elbow to straighten. The same goes with trying to power the golf swing. And if your right elbow gets too far away from your body on the downswing, the more likely you are to come over the top.


3JACK

Thursday, October 8, 2009

3Jack's Translation of TGM: Part 8G


7-18 (Left Wrist Action)

Left Wrist Action is classified according to the changes in the Left Wrist condition prior to impact. The downstroke changes are opposite of the backstroke, but not necessarily occuring at the same points of the stroke. For instance, the left wrist may cock on the backswing and thus it will uncock on the downswing. But it may cock in the backswing when the right forearm in parallel to the ground, only to not uncock until right before impact.

Trigger Delay alters little geometrically, but magnifies the physics.
So the geometry of the swing won't change much if you increase your trigger delay, but it will increase the physics, particularly Force (Force = Mass * Acceleration), trigger delay essentially magnifies the Acceleration.

Homer then talks about the 'Paddlewheel' action. This is the action the 'hitter' makes. Basically Homer is stating that the right arm moves like a paddlewheel on a steamboat moves. Here's what the paddlewheel looks like.


And from there Homer basically explains how the golfer who uses the paddlewheel action will increase power with more trigger delay. But remember, per the Endless Belt Effect (2-K), the hand speed stays the same, but the clubhead speed gradually increases. But with Trigger Delay, the greater the trigger delay the more rapid the paddlewheel action becomes.


7-19 (Lag Loading)

There are 3 different types of procedures the golfer can use to create lag in the downswing:

Drive Loading (Hitter)
Drag Loading (Swinger)
Float Loading (Hitter or Swinger)

Incorrect Clubhead Lag Pressure 'Feel' does not set up a steady driving pressure but a convulsive, impatient THROWING pressure, guaranteeing Clubhead Throwaway.
There's a reason why I think there's a difference between 'throwaway' and 'flipping.' I think 'throwaway' is basically losing a bit of the primary lever assembly whereas flipping has a bent left wrist at impact. This is because Homer states that 'if the thrown Clubhead doesn't pass the Hands until after Impact Fix Position is reached, it still complies with the Law of the Flail, but precision Timing and Clubface alignment becomes difficult.'

I think 7-19 is extremely important to understand because not only can it teach the proper mechanics behind how to lag the club and the variations of how to lag the club, but it stresses that this loading is a STEADY DRIVING PRESSURE not a convulsive, impatient throw.

The swish drill is a good drill to understand the steady driving pressure and the steady acceleration of the clubhead thru the impact interval. Once the golfer can understand how to get maximum acceleration of the clubhead at impact and then understands how to hit down properly enough on the golf ball (with the irons), they'll reach the #1 alignment in the golf swing, the flat left wrist at impact. Here's a video of the 'swish drill.'


3JACK